The Refurb
I’d never laid eyes on a real Pachinko machine until this one, so I spent a long time at the sale trying to gauge whether it really worked or not. I didn’t know enough to be certain, so in the end I saw enough happening that I was willing to take a chance on it. It hadn’t been touched in a very long time, so our first step was to get as much dust and cobwebs out of it as possible with a rechargable air duster. After that, it took the better part of a weekend to work out why the firing mechanism didn’t actually want to fire, which helped me to learn about how the feeder tray and lower track worked to pay out winners. By the end of the first weekend, we knew enough to fire balls successfully into the play field, so we knew we had a working machine.
After that, the full cleanup had to begin. I was leery of getting the machine into a state of disassembly that I wouldn’t be able to get back into working order, so I tried to be as delicate as possible. I started by taking off all of the brightwork and plastic from the front of the cabinet, polishing the chrome and cleaning all of the plastic pieces as thoroughly as possible. The plastic is unfortunately pretty faded, so I tried to polish it up as best I could but it will certainly never look like it did 35 years ago. I removed the Nishijin badge from the front so it could be polished and re-glued to the unit; I also removed every plastic piece from the game board and did similar cleaning on those pieces, with rubbing alcohol and a lot of cotton swabs. Where possible, I removed the decals where they were curling, and re-glued those as well. The tulips in particular were curling badly off the plastic and needed re-worked. I left the pins alone; they are in need of a polish but having never done this before, they very much worried me in terms of removal and replacement. I also did a wash of the field with rubbing alcohol, but just like the external plastic, the field was pretty faded and there was only so much that could be done to freshen it up.
I also didn’t know how to test all the lights; with firing the balls, I could see some fire but I knew there had to be a way to test further to ensure the bulbs were all working, and I had exposed far more lights than I realized were there as part of taking everything apart to clean it. It was at that point I found the North America Pachinko Club group on Facebook, where several members kindly taught me how to trigger the jackpot described above to be able to see the entire sequence of light and sound. This showed me that I miraculously only had two bulbs that weren’t working out of the entire machine, but since I had the entire thing apart, it made sense to change all of them out wholesale because at this point, after two full weekends and some evenings, I’d already decided that I never wanted to open the thing up again once I was done.
Originally, I’d planned on switching out all of the bulbs with LED, so I could brighten the field up a bit with brighter bulbs over the same level of power consumption. I really struggled to find bulbs that I thought would survive at the voltage coming across as per my multimeter, though, at least at a price I was willing to pay and a size that would fit in the existing space. (Also, I was concerned about managing polarity in polarized LED bulbs - I’m definitely no electrician). In the end, I needed three different incandescent bulbs as replacements: an E10 screw base for a couple spots, T3.25 wedge bases for the larger playfield lights, and T1.75 micro bulbs with wire bases for the bulk of the lights, which are tiny. Installation was relatively easy - the original silicone sleeves that held the bulbs were all still intact, so I was able to ready the wires through the sleeves so that they’d hit the contacts on each mounting board, which would have been much more difficult without the sleeves. As an aside, I’m genuinely not sure whether the small bulbs are meant to be T1.5 or T1.75, because I had a mix of both in the machine when I took it apart. The extra millimeter or so didn’t seem to make a big difference, though it did make the sleeve bulge a bit more, certainly not enough to tear the silicone.
The lights were the last part to get done (mostly because it took about two weeks of ordering and returning various bulbs to get all the right ones). Once they were all in and tested, I was able to get all the various parts put back into place and the game machine itself was ready to go, fully playable on the two feet that were stapled into the bottom of the game cabinet. But that wasn’t enough for me to call everything done.
The Wall Cabinet
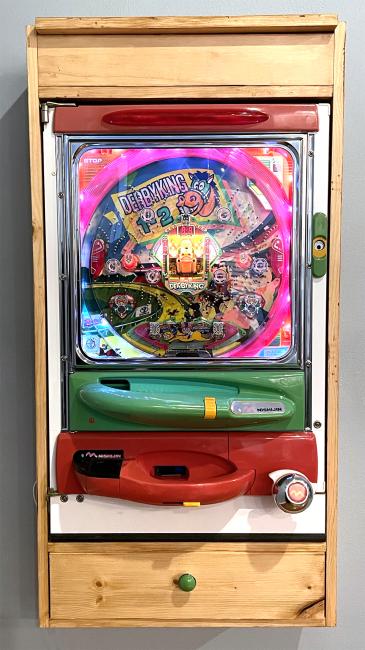
So, sure, the game itself is probably in the 50-pound range, even more if it’s fully laden with solid stainless steel balls. So it’s not exactly going anywhere if you’re just playing with it and it’s on the standard feet that many people attach to their machines, something like what Bill at Pachinko Restorations sells. But shelf space that will hold a machine like that is at a minimum in my house, and wall space definitely is not, so I bought the plans for a full wall mounted cabinet instead, planning to take off the feet that my machine came with. This cabinet design is pretty great, with a nice upper section that can hold hundreds of balls in reserve and funnel them into the feeder tray as needed, and a lower section that can be closed off and catch all of the balls that are wasted so that the machine doesn’t have to come off of the wall in order to reload the top hopper.
I am very much not a carpenter, and I didn’t want to blow a ton of money that I might easily screw up, so I went with a really simple pine construction for the cabinet. My daughter wanted to do a light finish on it, so we also picked out a cherry-colored stain rather than painting the thing. As it turned out, that was far too light on the pine so for the final coat I darkened it some with a walnut stain over the top. She was happy with the overall result, but if I were doing it again I think I probably would have painted instead. The construction was pretty easy, particularly once I discovered that corner clamps were a thing to help me with squaring the entire unit.
One thing I did mess up from the plans was the all-wood French cleat that the plans called for; not having access to a tablesaw made it exceedingly difficult to get a good angled cut to serve as the hanging point between the two pieces of the cleat. So, for that, I went overboard and got a 160-pound rated aluminum cleat to mount to the wall and back of the cabinet, applying some rubber feet also to the back of the cabinet to keep it level after adding in the additional depth for mounting the cleat to the back instead of flush as the plans called for. Also without access to a tablesaw, I found the machine stop strips at the back of the cabinet to help lock the machine to the right depth to be difficult to make. So, instead, I used half-inch dowel pins at the right depth, glued into the sides, to make the stops. I can see how using the full wooden strips would have made alignment easier, but with proper measurements the pins aligned perfectly as well and were plenty sturdy.
With the cabinet assembled, I took all of the ramps that were built to route balls into the feeder tray at the top, and into the waste bin at the bottom, and glued a thin sheet of EVA foam over the top to deaden a little of the sound of the balls falling in and rolling around.
For one final touch on the cabinet itself, my daughter wanted to add a vintage-feeling drawer pull. She chose a round chromed knob with a porcelain center, and did a color match to the lock shield at Lowe’s to get a sample in green. She then masked the chrome, scuffed up the porcelain to help hold a coat of color over the top, painted the knob, and clearcoated it before installation. It definitely looks better than anything I did with the woodworking!
The machine fit more or less perfectly into the cabinet, so once I had it in place, I was able to lock it in by running screws through the frame of the cabinet and into the wooden frame of the game itself. As long as it’s on the wall, I’m pretty sure that thing isn’t going anywhere.
Lessons Learned
Now that it’s up on the wall and playable, I definitely know a lot more about Pachinko than I did two months ago (which was pretty much nothing and might still be). First is that I kind of want another machine already, though next time I want an older, single-shot model, I’m pretty sure. I love how kitschy and late-80’s-early-90’s the vibe is of Derby King and I can’t see myself parting with it, but the more restrained style of the models that I’ve seen from the 60’s is just so fantastic as an object d’art and I can definitely see myself eventually having a couple for that purpose even if they’re maybe not as exciting to play.
With regard to this specific machine, though, I also learned that it looks really dark inside the game once it’s on the wall. I fixed this a little by adding a short length of LED strip lights into the inside frame of the game board. I don’t exactly love it, as I can’t quite match the temperature of the LED strip to that of the incandescent bulbs behind the board, but the strip itself is invisible once the service door is closed, and it does add some extra light to the gameplay, so it could be worse.
If I were doing it over again, I probably would do some more research to see how I could do a full LED conversion on all the lights, both to have more control over color temperature but also just for the longevity, brightness, and power consumption. I really did struggle to find LEDs that looked like they would work without much heavier electrical work than I was comfortable with, but there must be something out there.
I’d probably also get some carpentry help to improve the fit and finish of the whole cabinet; I knew going in I probably wouldn’t be very happy with the result, because I’ve been a mediocre woodworker since high school, so it would be cool to have a cabinet more polished than what I ended up with. It’s not bad, it’s just not as nice as I want.
And the last thing is something I probably will take care of pretty soon - I used scrap EVA that I had laying around to cover the ramps, but it was 2mm foam and that isn’t enough to make it not still very loud. I’m thinking the way to go is probably 4mm on top of each ramp and then 2mm under each ramp to dampen the sound of dozens of solid steel 11mm ball bearings banging around constantly against solid wood - unless that’s the part of the allure to you, I guess? I can’t imagine the cacophony of going to a real Japanese parlor, yikes.
Note: Product links in this post leading to Amazon are affiliate links that may offer me a commission.
- Log in to post comments